|
I've just added two new authentic sewing patterns for lovely bonnets from the early 1870's. These are taken directly from original French sources and the pattern pieces are scanned full-size. I've added my translations of any existing French text (not a garbled Google translation, but a real one -- I was originally trained as a linguist). I've also included notes to help with interpretation and construction of each design based on my many years of experience in working with these patterns. See these new items in the "Blog" section of this website under the "Free PDF Patterns" category (scroll down the page to find the two latest patterns). Or use this link to go directly to the page: These patterns are free of charge, created especially for anyone who may have been reluctant to buy PDF sewing patterns to give the process a try at no cost (but note that they are still copyright -- do not copy or share, just give anyone interested the URL for this site).
Once you've got the hang of using these digital patterns, give a larger garment pattern a try -- use the link below to go to my Etsy shop, 'The Fashion Archaeologist' and browse all my currently available "History House" patterns.
0 Comments
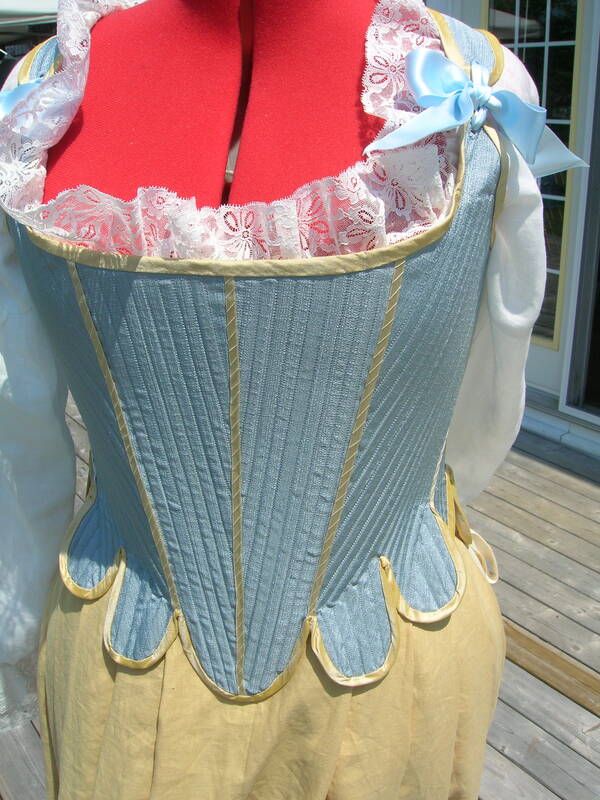
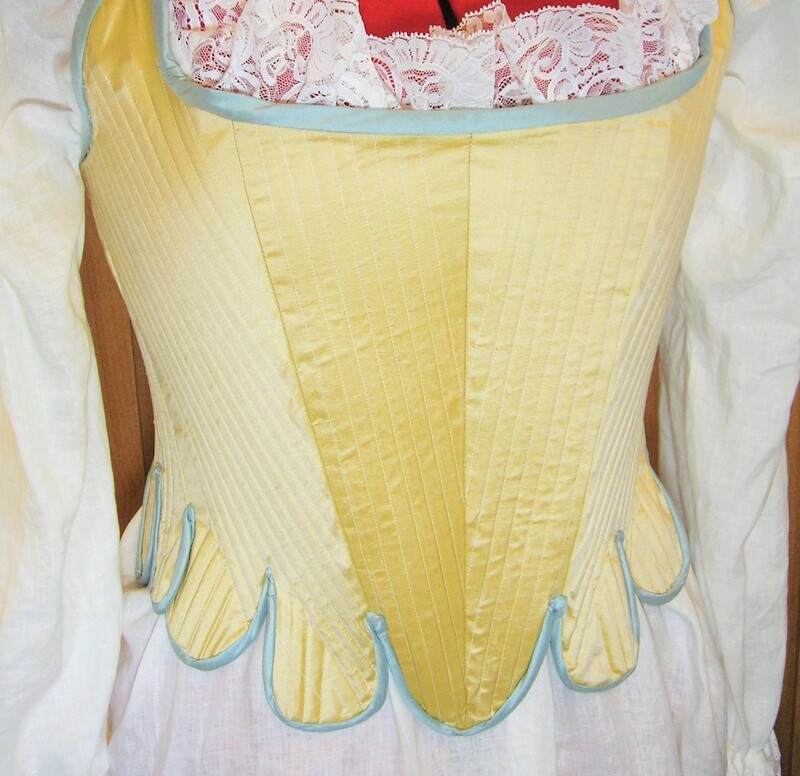
Examples of silk stays bound with silk taffeta bias. 18th Century stays are so beautiful, and actually fairly straightforward to make (at least in my view, compared to Edwardian corsets). But everybody seems to dislike the binding process, and I can't say that I don't understand the complaint. Either it seems the end result looks untidy, the binding itself is difficult to work with, or the procedure is hard on the hands. Yet I think there are ways to make the process less disagreeable and the result more attractive. First, I have to say that in looking carefully at a number of extant stays of the 18th C., the binding was not always smooth and perfect. If its purpose was mainly to seal the raw edges and prevent fraying, and only secondarily to look beautiful, then I think you can justify a less than perfect binding on historical grounds. So relax a little, but consider the following alternatives. First, I firmly believe that for modern reproduction stays, a bias binding is easiest to work with, and available in many colours. It is also, in my view, more beautiful than leather binding (unless your purpose is to accurately reproduce historical stays that would only have been bound in leather/chamois). Bias binding presents two main options: purchased bias binding or self-made binding. Personally I prefer the latter. On silk or fine woollen or linen stays, closely-woven silk taffeta, cut into strips about 3.5cm (around 1-1/4") wide is beautiful, easy to work with, and tough enough to withstand a lot of normal wear. On linen or fine wool stays, self-fabric binding (in a contrasting colour) is a good option as well, although the linen binding will need to be closely-woven to work well. The problem with purchased bias binding is that it tends to be made of polyester (or a poly/cotton blend). This fact alone rules it out for use as binding in my view, because it will be much less workable than a natural fabric that has good resilience, spring, and flexibility to go around tight corners and edges. My favourite choice then for the type of stays I make is silk taffeta bias. It can be machine-stitched on, but I honestly find that the process of machine-sewing binding onto the closely-spaced and deeply-cut tabs of 18thC. stays is so fussy and requires so much twisting and turning of the work and contortions of the hands, that it's not much faster than hand-applying the binding. So I hand-apply my silk taffeta bias binding, using a very short back-stitch. Whether the binding has its inner edge pressed in order to finish that edge neatly on the inside of already-lined stays, or whether the raw inner edge is just turned to the wrong side and loosely tacked on before the lining is applied, the same application process can be used as shown in the short video below (the link will take you to the video on my Facebook page). I've found that this method minimizes undue bunching at the inner points, and gives a smooth appearance to the finished tabs. The silk bias is also quite lovely on its own merits as an embellishment, and of course can be had in almost any colour. It took a massive effort, but I've finally managed to move all of my "Construction Help Photos" from my old, outdated photo gallery (that was no longer compatible with this website), to their new home here. For any of my customers who have purchased a pattern that included a link or links to the old help photos, please be aware that these will no longer work (the technicalities are beyond my ken, it's all Geek to me!). I'll be attempting to update the links in the PDF versions of all Sewing Instructions which contain the old links, but if you've purchased a paper version in the past, the instructions won't be updated and you'll need to use the link below to access the new one. Find the new "Construction Help Photos" here on my site: These photo tutorials are intended and designed for those who have purchased a 'History House' antique pattern. Not every pattern will have help photos/tutorials, but I've tried to focus on the more challenging designs or those with particularly unique or unusual construction points. I feel the construction of most of the other patterns is well explained in the Sewing Instructions that come with those patterns. But there will be additions from time to time, so please check back again.
And of course... you can also send me a message on Etsy or Facebook if you need particular help with some aspect of construction (see links below). Happy Sewing! In the next installment of my ongoing series about the importance of properly made foundations for Edwardian gowns, and how to construct them, here is a "flash" photo-tutorial showing the steps in order. This foundation was made of lightweight silk taffeta and fully boned except for the two side seams. I generally like to leave two of the side seams unboned in order to allow for possible future fit alterations. Since Edwardian bodices usually are not fitted to the person, but to the foundation, and are often fairly blousy or loose, it's the foundation that establishes the fit on the body. If you lose or gain any significant weight and need to alter the foundation, leaving one seam unboned on each side makes the job far simpler! The foundation shown in the video was constructed for the formal velvet afternoon or dinner gown I recently made as the sample for sewing pattern #1910-A-015. If you have good sewing skills you can make this gown for yourself. To see details on the PDF pattern or to buy, click on the button below. (The pattern is also available in paper format, to the U.S. only -- see the separate listing in my Etsy shop). Velvet has the reputation – and deservedly so – of being difficult, even terrifying, to work with. It has been a high-status textile for centuries, and was a favourite of the Edwardian era, especially for dressy day gowns, dinner or reception gowns. There is little doubt that a velvet garment can be stunning and beautiful, but some skill and understanding is required to make one that fits and drapes well. My purpose here isn’t to delve into the history of velvet or velvet fashions, but to give you some tips on how to work successfully with this challenging material. First, it's helpful to take a look at the velvets on the market today.
When looking at photos of luscious late-Edwardian and 1910's extant gowns, many people are unaware that the softness and fluidity is a complete illusion, meant to present an outward effect, but built upon a hidden world of structure below. That structure was the essential secret underneath Edwardian and 1910's garment construction. Aside from the work of the corset in creating the fashionable line, virtually every evening gown, and most dressy day gowns from 1900 through to the end of the WWI era, were constructed over a closely-fitted, even personally-fitted and boned, foundation or under-bodice, to establish the proper silhouette. A secondary purpose of the closely-fitted foundation was to provide a sort of firm scaffold on which all of the outer elements of the gown could be mounted, including the often heavy, widely-trained skirts. Thirdly, the foundation helped to keep the entire garment from shifting on the wearer's body when worn -- most evening gowns, and many fancy day gowns, had the addition of a petersham belt sewn into the foundation for this purpose. Lastly, a well-designed foundation prevented costly textiles from coming into direct contact with the body and provided additional support and protection for the garment itself . Although those of us who have worn 18th century stays are familiar with the usual way these are spiral-laced, there can be a problem with stays that are back-laced only, if no one else is around to act as a helper or dresser. I personally prefer back-lacing stays for their smooth, firm and comfortable solid fronts. But getting spiral lacing done up properly and firmly on one's own in back-lacing stays can either require a feat of contortionism or a valiant surrender to a less-than-ideal silhouette. Some time ago, mostly out of necessity because my "helper" husband was having an almost excruciating time: (a) trying to understand the physics of spiral lacing; and (b) trying to actually do up the lacing effectively, I devised a bit of a cheating lacing system -- what some might call an 18th century lacing "hack". Do you have PDF anxiety? Perhaps afraid to purchase a full-sized PDF pattern because you think you might not be able to figure out how to print and assemble it? Concerned that printing a PDF at home might take too much time, skill, or printer ink?
If so, here's your chance to test it out without risking any money. I've made some PDF patterns available below that are small enough to print out on a maximum of 4 sheets of regular printer paper -- just enough to give you a sample of what's involved in the process. Click on the "Read More" link (below right) to access the patterns and more information. There's hardly anything more wonderful than a new beginning -- whatever kind of beginning it may be. In my case, it's the first post in my new blog on my new website! I think that qualifies as exciting (at least to me it does!).
For years I coped with a plain vanilla, ludicrously basic DIY website that really didn't serve my needs well, but at least gave me a spot on the internet. Then came my Facebook page, which was much better in many ways, but still didn't give me a really efficient place to permanently organize and access all the thoughts, articles, and projects that I'd want to share. With Facebook, everything moves down the scroll and out of sight so quickly. Good luck trying to locate a short post on an obscure topic six months later! |
AuthorPatricia Preston ('The Fashion Archaeologist'), Linguist, historian, translator, pattern-maker, former museum professional, and lover of all things costume history. Categories
All
Timeline
March 2024
|


 RSS Feed